September 12, 2010

47 days!

It's getting so close!  After spending months twiddling my thumbs and wondering what wedding planning I could be doing, I have so many things to do that I'm not sure what to do first!  Luckily I have deadlines for meetings and payments, so that helps keep me organized.  


A few days ago my mom and I met with the florist to finalize the details of my order and also the "day of" schedule--when and where to drop everything off.  Linda brought a sample bouquet and two boutonnieres with her so I could have a look and add/drop any flowers.


I had originally told Linda that I wanted a lot of orange, with fuschia and purple and some lime green mini hydrangeas.  The bouquet that Linda brought was very much a fall bouquet--lots of orange, but also red and green.  I liked it, but I was going for more of a wildflower look.  Luckily my mom made some suggestions that I think will help achieve that look.


Another thing we did was hold the bouquet up to the plum colored napkins that we bought to put under each centerpiece.  Since the flowers will be the same, it was nice to see the contrast between the flowers and napkin.  The dark napkin really makes the flowers pop.  


All in all, for my bouquet plus three BM bouquets, nine bouts, four coursages, 10 small arrangements for the pews in the chapel, and 10 centerpieces, I am playing about $1000.  I think that's a pretty good deal.  My mom kindly decided to pay for two large arrangements for our stark white chapel, and that set her back $150.  I thought that was kind of a lot, but she said that was what she was expecting to pay.


I am nervous about the florist, though.  I recommended her to a friend who got married a few months ago, and the bouquets and boutonnieres looked a little under the weather.  It was a hot, July day following a massive rain and that isn't really an excuse for slightly browning and sad looking flowers, but I think the florist may think it is.  So I am concerned that I will not get the most stunningly perfect flowers that I can imagine, but I guess I care more that I'm not paying an arm and a leg for them.  I just need to keep that in perspective.

August 25, 2010

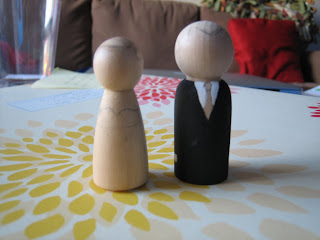
DIY cake topper

So, remember the cake topper that I was in love with?  Well, I decided that I should at least try to make one myself before ordering one online.  The materials are so cheap (or you can buy a kit here from Goose Grease), and it's not a very time consuming project.  And I found a great tutorial here which helped seal the deal.

So I headed to Michael's to buy my little wooden people, some paints, and paintbrushes.  All in all I think it cost me about $10!  The wood figures come in packs of two, so I bought a pack of boy figures and girl figures.  Then I had extra in case I messed up!  I bought a couple paints--brown for our hair, cream, beige--and I got lucky because my mom already had black, and I already had a little pot of silver paint. Oh, and I got some clear varnish to seal it all up.

Here is the how-to:
Step 1 - draw the outline of the hair and clothing on with pencil.  I thought about adding faces, but I think that would have been too challenging for me.

Step 2 - paint!  I started with the black tux because the was the paint I had at the time, and it was basically the whole boy figure.  Remember to leave bare spaces for hands!
 

Step 3 - varnish.

Step 4 - make base for the little guys to stand on.  (This is the step that I am at now.)

Step 5 - glue the dudes on the base.

Step 6 - admire. (I have skipped ahead to this step a few times already!)

July 28, 2010

DIY invitations, part 2

Tips

  • I printed the invitations on our HP ColorJet printer.  I only needed to buy a new color ink cartridge before printing and it lasted for all 300 cards!  
  • The printing took me a few hours on a Saturday.  
  • I found that the printing looked much better if you printed in small batches (10 cards or so) at a time.  Once I set the printer to print 15 at a time and the color began to fade on the last one.
  • With the 4 bar cards, I had to feed each one through individually because the printer would shoot two through at a time.
  • Practice stamping!  Because the white enclosure card (the card mounted onto the slightly larger blue card) was slightly textured, the stamp rarely turned out "perfect."  Now I think they look just fine, but I was a little disappointed at first.
  • Ink your stamp every time!
  • You can stamp and powder several (we maybe had 15 sitting around at one point) before heating them.
  • Wash and dry the stamps frequently so that you get nice sharp lines and don't have much bleeding of ink.

July 21, 2010

DIY cocktail napkins

I was inspired by a friend of a friend's custom cocktail napkins which were printed with trivia style facts about the couple.  Fun!  And then I bought one of the DIY Bride's books where she made simple version of the custom cocktail napkin using rubber stamps.  (PS-This is a great book for those brides looking for easy and interesting projects.  The instructions are great and she even gives a cost approximation for each.)


Hello, I already ordered rubber stamps for my invitations.


So, while I had my fabulous friends over to work on my invitations, I put them to work stamping 600 (!) napkins as well.  Now, I only had four friends come over but let me tell you, every single invitation was made and every napkin was stamped.  I was blown away by their motivation and hard work.  


We used the silver pigment ink with the monogram stamp on navy blue napkins.  I ordered the napkins from My Paper Shop for $18.  What a steal!  My friends were digging this project so much that one friend may use the idea for her January wedding.  With friends like these, she'll be able to make 1200 napkins in just a few hours!


I hope 600 napkins is enough for about 200 people.  I figure once it gets later in the night no one will notice if they have a white cocktail napkin or none at all.  It's the first impression that counts!

July 17, 2010

DIY invitations

After attending the Paper Source wedding invitation workshop, I have been thoroughly set on making my own invitations.  I priced it out, and it would save a few bucks doing it myself.  Plus, I love crafts and I have a bunch of wonderful friends who immediately offered to help.  What more can a girl ask for? :)


So I created an invitation layout with a friend who is an editor (thanks, Deb!).  She helped me line everything up right and get all the spacing set.  I spent hours trying to find the right font color only to decide that it will never match perfectly so I should not worry so much.  Then I bought all the supplies and the girls headed over for a surprisingly quick and painless night of stamping, embossing, and taping!
I decided to go with a layered square invitation.  I also kept the stamping idea and ordered a monogram stamp and an address stamp.  The monogram was heat embossed onto the invitation, and the address stamp was used for the return address on the main envelopes and the main address on the response card envelopes.


Here is a price breakdown for 100 invitations.  I bought all the supplies at Paper Source.  On some items I got a 10% discount for buying 10 or more packages.


Cost
$24 soft white 4 bar cards (8 x $3)
$27 night 4 bar envelopes (10 x $2.70)
$21 luxe white fine square enclosure (4 x $5.25)
$17 night 5.5" x 5.5" card (4 x $4.25)
$38.30 night 5.75" envelopes (10 x $3.83)
TOTAL $134.50


$3 silver ink pens (2)
$8 embossing powder
$24 heat tool
$6 midnight ink pad
$8 silver ink pad
$12 tape runners (2)
TOTAL $61


I ordered two 1.5" square monogram stamps from www.rubberstamps.net for $10 each.  And I ordered two return address stamps from tickled pink paper ink for $18 each.  Since once person pretty much did all the envelope stamping (thanks, Meghan!), I probably didn't need to order two of these.  


I did need to get two more tape runners and also a new heat embosser while we were working on the invitations.  The heat embosser just crapped out after about 20 min and we are not sure why.  But I have the warranty and the receipt, so I can return it for a refund.  I got the second heat tool at Joann's, and the clerk used a 50% off coupon for me, plus I was able to use a friend's (thanks, Claire!) teacher discount for another 15% off!  The cost of all of this came to $24.  


GRAND TOTAL (without tax and shipping) $251.50
For 100 invitations: $2.51 each

July 10, 2010

Cake tasting!!!

Tomorrow is our cake tasting.  I have been looking forward to this for months!  Our cake is included in our package with the caterer, so all we have to do is head over to the bakery and taste some samples!  (I think)  


I really am not totally sure what we get with this package.  The bakery (Rolf's Patisserie) has a few different types on their website, but I am not sure what we are allowed to pick.  Also I do not know exactly how much I can dictate what design I want.  I do have some in mind, though…


(source: 100 Layer Cake

(source: Style Me Pretty)

(taken at a friend's wedding)


I love that rustic look of the frosting, and the glam of the sparkly rock candy and silver dragees (does anyone know how to pronounce that?).  I also saw some gorgeous cakes at Sweet and Saucy Shop, a bakery in California.  I think I linked to their website through another wedding blog, but oh my god.  They make the most gorgeous desserts!  

I made a presentation using google docs, and I think I am going to print it at FedEx Kinkos to bring with tomorrow.  Hopefully they'll see what I like and they'll be able to accommodate me, or at the very least suggest something similar.  

I'm so hungry right now…time to make breakfast and put away these sweet dreams!

June 17, 2010

Suit yourself? Too expensive.

From early on we knew we wanted the guys to wear suits in the wedding.  Since we are keeping things slightly casual, we thought tuxes would clash a little too much.  So we had decided: charcoal gray suits.  

But suits are expensive!  We felt terrible asking friends to spend $300 or more on a suit that they may not ever wear again.  And we couldn't ask the guys to just wear a suit of their own because some do not even own suits at this point.  Now, I know that this is a little ridiculous considering women spend hundreds of dollars on BM dresses and rarely wear those again. But I think most of my friends have done a good job of choosing an affordable dress, and some of them I will [hopefully] wear again.

Well, apparently there are no suit rentals in Chicago.  Now, I didn't go out of my way to search for vendors but I was told that no one rented suits.  And when I did a Google search the only results were for tux rental companies.  So we did what we had to and picked out the most basic tux you could find.

We headed over to Men's Warehouse the other night and made our reservations.  Joe wears suits everyday for work, so he knew what he was looking for.  Unfortunately the only color options were black, white, and light gray.  So we opted for black.  I think it will look really nice with the navy blue BM dresses and really, why would we choose white?  Light gray is great if it were a summer or daytime wedding, but for an October afternoon not so much.


(source: finetuxedos.com, After Six tuxedo)

The tux really looks like a suit.  The only difference is that there is a shiny stripe that runs down the sides of the pants, but I don't think it is very noticeable.  I could barely tell it was there.  

The cost of renting the tux was $125 and that included:
  • Tux (jacket and pants)
  • Shirt
  • Shoes
  • Tie and vest
We want to provide the ties for all the guys ourselves, so we wanted to opt out of that.  And the vest.  And the shoes.  Because really?  I'm sure all guys have black shoes to wear with a suit.  The girl helping us told us this would only save us (really the groomsmen) a few dollars but we stuck to our guns.  Turns out the cost went down to $87!  That's a big savings!  And Joe got his tux for free, so that's a big bonus for us.  

It feels so great to check another thing off the to-do list!